Tuesday, May 13, 2008

How to include RSS feeds into your components using OPML

It is really easy to include RSS feeds and links in your components - all you have to do is to place a buckminster.opml file in the root of your component (or tweak the properties if you want to call it something else, and place it elsewhere).

The OPML file itself has a very simple XML syntax. You start of with the usual xml declaration and declaring that you are using OPML 2.0.

<?xml version="1.0" encoding="ISO-8859-1"?>
<opml version="2.0">

This is followed by a head declaration where some information about the content of the OPML file is kept.

<head>
<title>Component information for org.demo.exampleComponent</title>
<dateCreated>Mon, 14 Apr 2008 14:18:51 GMT</dateCreated>
<ownerName>Your name, or name of project</ownerName>
<ownerEmail>contact.us@somewhere.com</ownerEmail>
</head>

And after the head comes the body part that consists of a sequence of outline elements - they can be nested if you want to use "subfolders".

<body>
<!-- outline elements --!>
</body>

A regular link (non feed) is expressed in an outline element like this:

<outline text="Cloudsmith" description="Cloudsmith's site" url="http://www.cloudsmith.com" language="unknown" title="Cloudsmith" type="link" />

And a feed is just as simple:

<outline text="My Feed" description="This is my feed" htmlUrl="http://www.somewhere.org" language="unknown" title="My Example Feed" type="rss" version="RSS2" xmlUrl="http://feeds.somewhere.org/examplefeed"/>

In both of the above examples - the "text" attribute is the label typically used in the RSS reader's bookmarks. Some OPML viewers use the title instead, and the reader may or may not show the description. Regular links (type="link") should use the "url" attribute for the link, and a feed ("type="rss") should use the "xmlUrl" attribute for the feed, but also add a link to a human readable web page - this is done by using the "htmlUrl" attribute, and it is often a link to the page where it is possible to subscribe to the feed, or read its content online.

In the feed example above, the feed type is "rss" - and the version "RSS2". A feed should always have the type set to "rss" (including atom feeds, but for atom feeds, the OPML spec is vague - I use "atom" as the version and it works just fine). These tags are mainly for a processor of the OPML itself, a feed reader will look at the actual feed to determine its type anyway. You can read more about the OPML 2.0 standard here.

And then finally, a subfolder is very simple to create:

<outline text="A Subfolder">
<outline .... />
<outline .... />
</outline>

Even if the creation of a component's OPML (at least for now) is done via manual editing of XML, I hope the examples above show that it is really quite easy.

Monday, May 12, 2008

Feed your Buckminster

Did you know that Buckminster can deliver RSS feeds and links that appear in the Eclipse UI?

We wanted to make it possible to share content that relates to a component, such as a links to wiki, bugzilla, and documentation, and to RSS feeds like a version feed, open and closed issues in bugzilla, examples feed, why not a "checkin feed", or why not a feed with the lastest available plugins...

We selected the OPML 2.0 XML definition for Outline Processing - essentially describing a structure of links and feeds - or bookmarks if you like. And we decided to include this into the Buckminster model. This means that a component type can auto generate meta data from components that have extra "community" information and make this available in the form of OPML. Buckminster recognizes that a component can have an OPML file embedded in the component (by default it is called buckminster.opml and is placed in the root of the component, but it is possible to have it in some other directory and give it a different name by setting properties).

Buckminster includes two new views that makes use of the new OPML feature, a Component Explorer that shows all components known to Buckminster, and a Component Outline that follows the current selection showing the related component information.

Here is a screenshot of the Component Outline, which also shows Buckminster's integration with the RSS Owl Reader.


200805122051.jpg

If you want to try out the RSS OWL integration - there is a preview available at our update site http://dev.cloudsmith.com/updates3_4 - it is based on RSS OWL 2.0 M7 but with some patches applied.

And here is a screenshot of RSS OWL showing the example feed:


rssowlbuckyexample1

Clicking on the links in RSS OWL will start buckminster materialization, or open the cquery editor!

Friday, March 21, 2008

Murphy and OSGi services

On Tuesday we gave our talk on Cloudsmith, Buglabs, Spaces, and AOL Xdrive - titled "Building OSGi services out of the cloud" - We had about a 100 people (my quick count), and everything was going really smoothly until we switched over to the demo part where we showed taking a picture with the BugLabs BUG device (a plug and play hardware device running Linux, and OSGi), storing the picture on an AOL Open Xdrive, and then retrieving and showing the image on an Android device using a Felix OSGi runtime to obtain an Xdrive image viewer from the Cloudsmith OBR repository. We also showed all the steps how to get the SDK's for the BUG, and for Andorid using Cloudsmith "one click materialization". There was one thing we had not tested before we started the demo; what happens if you leave the laptops on for 15-20 minutes while presenting from a third laptop....? And naturally, the one scenario we had not anticipated did bite us bad. The power supply in Ballroom E decided it did not want to deliver any power. At the very moment with took the picture with the BUG, the laptop that served as a router decided to hibernate - so the picture taking app hanged on the BUG - but somewhere in the process something did work because at the end we discovered that Ken had managed to take a picture of Ballroom E's ceiling :) (There was much laughing in the room). The laptop for showing the Android part (where we had everything prepared with preconfigured workspaces, and even a spare cloudsmith site server (in case we we should loose the wifi connection)), was at the end of its battery life, and the 15 minutes without power at the beginning of the presentation caused it to shut down! So audience got to see a boot and startup of a whole bunch of services. At a critical moment, a slight tremble of hand caused two Android emulator instances to be started, and unfortunately, the first one that appeared on the screen did so, because it was really the second instance started, and this instance did not have anything to start up, so hence started much faster. So when the second instance started, we killed it (big mistake). So, big surprise when we tried to run the demo on a completely empty Android... Michal did a great job starting things again and typing long URL's into the android device emulator's user interface (it does not have copy paste) to get it all going again, while, as someone in the audience commented afterwards - looked like a confused C3PO I hope the glitches in the technical parts did not overshadow the main message about how Cloudsmith supports "building OSGi services out of the cloud". Murphy was right - "if it can happen, it will..."

Wednesday, March 12, 2008

Scramling to get your update site ready for EclipseCon?

Creating an update site to share your sample code and tutorials is a good way of distributing your talk material to your audience. In the Eclipse Spaces project we are providing a way to quickly create an update site in an AOL Xdrive. A cool feature (we think) in Spaces is that it also publishes links to source for the bundles you publish. The Spaces "Importer" can import binaries and source and can look up missing bundles without the user having to enter the right remote update sites. The dependencies as they are set up when publishing is saved and used when importing. We think it is pretty neat, and hope this will help you deliver your matieral in a convenient way for your audience. Some speakers have tried this out already. The instructions for how to use spaces are found at http://www.eclipse.org/spaces/ (and you can also see my earlier blog posting on the spaces topic). There is however one problem - AOL has fraud detection turned on that checks the validity of the phone number and zip code which makes it difficult for non US users (and anyone that does not care to reveal their phone number). Instead of going to http://eclipse.xdrive.com, or http://www.xdrive.com to register, you can go to http://www.bluestring.com as it does not require a phone number. As an alternative, here is a phone number that works 310 123 456, and you can use the zip code 90120. Also, if you like to try out spaces and need some help (with xdrive signup or anything else) you find us at irc.mainloop.net, channel "spaces" - we try to be online there as much as possible. See you at EclipseCon...

Tuesday, March 11, 2008

I got some questions about publishing to an update site using Eclipse Spaces and that the produced site seems to be broken as the URL produces a 404 not found. And since others may hit the same snag, I thought it best to explain.  This is caused by the update site URL not being  browseable. To see something in a browser you must append a "/" (or /index.html, depending on our browser) - you should then see an index page. Also, if feeding the URL to the Update Manager, or to "Import > Spaces" - it should work fine. The AOL xdrive HTTP publishing does not allow browsing of folders, you have to know the exact URLs. But this is enough for the update manager and imports to find what it needs. You can also try THEURL/site.xml to see the URLs to the other files. If anyone wants to talk live, you can contact the spaces team on irc.mainloop.net channel #spaces, or skype me at henrik.lindberg.

Monday, March 10, 2008

Eclipse Spaces - one step closer to code blogging

Wouldn't it be nice to be able to "blog your code" directly from inside Eclipse? Envision being able to share what you just implemented with others. Sometimes it is easy to post a few lines of example code in a blog, but a lot of the time a more elaborate configuration is needed to make it valuable for others. You would perhaps have to create an update site, or point the user to several source locations and let the user create a workable environment. Why isn't it as simple as just pressing "publish"? This was the fundamental question when we started the spaces project. The Eclipse Spaces project is now making a 0.1 version available where both "immediate publishing" and convenient consumption is available.

Here is how it works

Eclipse Spaces manages Publishing Areas of different types (such as an Update Site, or a flat list of files) inside a Space. A space is provided by a Space Provider such as AOL's Xdrive, SourceForge, or something generic like a File System Provider. To publish plugins to an Update Site, all that is needed is to select "Spaces > Publish" and then select the Space and Area where the plugin should be published. This will add the plugin to the update site with all update site meta data automatically generated. The update site is a normal Eclipse Update Site, and can be consumed with the normal Update Manager. But, Eclipse Spaces does more - when publishing is done, spaces also produces information in the update site for the Spaces Import Wizard which makes it possible to import not only the binaries bundles, but also the source (if it is publicly available), and to control if bundles should be installed in the target platform, or placed in the workspace. In addition to this, the Spaces Import Wizard can consult a mapping service and resolve and install bundles that are missing in the user's target platform. If you want to try this out here are some simple steps:

Preparation:

  1. Install Eclipse Spaces - you need Eclipse 3.3, and enter this remote site URL: http://dev.cloudsmith.com/updates
  2. Sign up for a free AOL Xdrive account (you get 5GB or free space) - note that AOL gives you an AOL email account when you do this, and this is the 'login' that you will be using later. Go to AOL Xdrive for Eclipse to sign up.

Publishing a plugin for the first time:

  1. Select "Spaces > Publish" in the context menu for a plugin project - this opens the space publishing wizard.
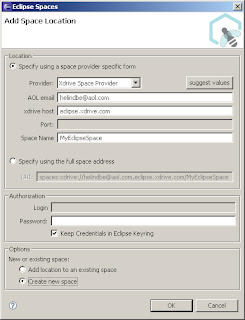
  2. Add the location to a new space by pressing "Add Space Location..." (then enter the address to your Xdrive account (i.e. your AOLemail, and the Xdrive host) + a name you select e.g . 'MyEclipseSpace')
  3. Select 'Update Site Publishing' (currently the only publishing operation available)
  4. Add an Update Site by entering a name (e.g. 'MyUpdateSite') and pressing "Add Update Site"
  5. Press Next and publishing is performed
  6. The URL to the update site is presented (and copied to the clipboard if you want)
  7. Use the URL in the update manager, or Spaces Import Wizard (explained below)

Publishing a plugin again:

  1. Select "Spaces > Publish"
  2. Select "Republish using previously used settings"
  3. Press Finish

Adding a second plugin to 'MyUpdateSite':

  1. Select "Spaces > Publish"
  2. Select the space, then the Update Site Publishing, and then the 'MyUpdateSite' publishing area.
  3. Press Next and publishing is done

Importing the Update Site:

  1. Select "File > Import "
  2. Enter the update site URL and Select where you want bundles to go
  3. Press Finish.

Spaces View

There is also a Spaces View, where it is possible to look at address information, reset password, discard a location, add a space location etc. Here is a screen shot
For more info on spaces visit Spaces at Eclipse.org

Monday, February 4, 2008

Eclipse User Group Sweden Formed

I am happy to announce that a Swedish Eclipse User Group has been formed, and that there is a site where Eclipse users and developers can share ideas and experiences in Swedish. So, if you can communicate in Swedish you are very welcome to The Swedish Eclipse User Group - membership is free. The idea to start this group grew out of the Stockholm Eclipse Demo Camp in December. This especially for developers that develop plug-ins for Eclipse, or write RCP applications. After Eclipse Demo Camp, the word started to spread, and we (myself and Peer Törngren) got in touch with other groups (or rather other individuals) that also had been thinking about forming a Swedish Eclipse User group. We decided to have very low formality, open to all attitude, no membership fees, etc. as none of the involved was particularly keen on handling the administration. Thanks to Cloudsmith for donating time to set this up, Mainloop AB, for donating the hosting of the site, and the Danish User Group for valuable input regarding running a user group. Special thanks to Peer Törngren (Cognos) for actively spreading the word - the group would not have formed without his initiative, and Patrik Tennberg (Nordea) for more contacts, ideas, and last but not least a promise to supply the conferencing facilities for the groups next meeting.

Friday, February 1, 2008

I just added Context Sensitive Help to a Dialog window in the Spaces project and since I at first could not find the information how to do this, I thought it may be of value to share some pointers to get others started. The first step if you are writing a Dialog and want to have the same nice integrated help system as provided in the Eclipse IDE Wizards - is to derive your Dialog from the TrayDialog class instead of from the (plain) Dialog. The TrayDialog should perhaps have been called something related to help, because 'support for help' is what it is adding. After having derived the dialog from TrayDialog, the dialog gets the (?) in the lower left corner, and you click that, or press F1 to get context sensitive help. Super simple. Now you need to do a couple of things to make it work:
  • registering help contexts for the controls (either the entire dialog, or the dialog and all the individual controls in it). To do this you need to get the WorkbenchHelpSystem, and call setHelp(aControl, aContext) for each control.
  • make your plugin extend "org.eclipse.help.contexts" and specify that this is a context extension for some plugin and point to a contexts.xml file which defines what will be popped up as context help. This definition can be very simple, but may contain links into the rest of the help system.
  • Write the help topics that the context sensitive help links to. You do this by having html files in your plugin.
  • To make context sensitive help inside your dialog (in a tray to the right) instead of as an "infopop" you must also make sure that you set up the dialog area correctly (see below).
  • Once you see the context senitive help, you may be surprised that you also see a search result of help topics below the context sensitive things you added. The help system searches for help topics that match the title of your dialog shell. In my case, I used the project name "Spaces", and there where quite a few help articles with the term "spaces" in them. So select your dialog title carefully.
@Override
protected Control createDialogArea(Composite parent)
{
 Composite dialogArea = (Composite)super.createDialogArea(parent);
 Composite container = new Composite(dialogArea, SWT.NONE);
 container.setLayoutData(
     new GridData(GridData.FILL, GridData.FILL, true, true));
 // then add your content to the Composite container...
}
The best information I found on how to get started with the Eclipse help system, and context sensitive help was in the book "Eclipse - building commercial quality plug-ins" - it is available on Safari. Chapter 15.3 (second edition) covers the help system. Here is a direct link to the chapter where extension points for context sensitive help and formats of files are described. If you are interested in the full source, take a look at the "AddSpaceDialog" in "org.eclipse.spaces.ui" project (in Eclipse SVN under technology/spaces). Bare in mind that right now this is work in progress...